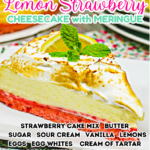
Lemon Strawberry Meringue Cheesecake Recipe
You deserve a treat, and this Lemon Strawberry Meringue Cheesecake Recipe was made for you! A delicious dessert shouldn’t feel complicated. With fresh strawberries, zesty lemon, and creamy layers, every bite will wow your taste buds. It’s a crowd-pleaser, so your family will love it too. Trust me, this recipe will make you feel like a dessert hero!
If you’re searching for the best Cheesecake Recipes, you’re in the right place! This recipe is so simple, yet the flavors feel gourmet. With sweet strawberries, tangy lemon, and creamy goodness, every bite will delight. Plus, you can make it ahead, which is perfect for busy days. Trust me, a dessert like this will have everyone asking for seconds. Go ahead, treat yourself to something extraordinary!

This dessert is perfect for your family, no matter your cooking experience! You don’t need fancy skills or hours in the kitchen. Everything is laid out step by step, so it’s easy to follow. You’ll feel confident knowing this recipe keeps things fun, manageable, and absolutely delicious. It’s the kind of dessert that will bring smiles without stress!
Easy Cheesecake Recipes
When it comes to making cheesecake at home, the options are endless and oh-so-delicious! We have fruit inspired ideas and versions that are geared towards holidays. They all bring joy to every gathering, making any of them perfect for family traditions.
- Strawberry Cheesecake Recipe
- Homemade Gingerbread Cheesecake
- Holiday Cheesecake Recipes
- Blueberry Cheesecake Recipe
No matter what you choose, these recipes are all about making moments extra special with treats everyone can enjoy!

Ingredients Needed To Make This Lemon Strawberry Meringue Cheesecake Recipe
The ingredients for this homemade dessert come together to create a rich, flavorful, and utterly amazing treat! From the fruity strawberry crust to the tangy lemon cheesecake filling and airy marshmallow meringue topping, each layer adds something unique to the overall treat. The balance of textures and flavors creates a masterpiece that’s sure to impress at any gathering.
Ingredients and Their Significance
Strawberry Crust Ingredients:
- Strawberry Cake Mix: Forms the foundation of the crust with a fruity sweetness that pairs beautifully with the lemon flavor.
- sweet cream butter: Adds richness and binds the cake mix for a firm yet tender crust.
- lemon juice: Enhances the strawberry flavor with a subtle citrus brightness.
Lemon Cheesecake Ingredients:
- cream cheese: The base of the cheesecake, providing that creamy and smooth texture.
- granulated sugar: Sweetens the filling, balancing the tangy lemon zest and juice.
- sour cream: Adds depth to the filling with its slightly tangy flavor and velvety consistency.
- vanilla extract: Brings a warm sweetness to complement the other flavors.
- lemon juice: Infuses the filling with a bold, citrusy tang.
- lemon zest: Adds an extra punch of fresh lemon flavor and vibrant aroma.
- eggs: Helps bind the cheesecake together while contributing to its rich texture.
Marshmallow Meringue Ingredients:
- egg whites: Creates the fluffy structure of the meringue with its airy consistency.
- granulated sugar: Sweetens the meringue while helping to stabilize it as it whips.
- cream of tartar: Ensures the meringue maintains its texture and doesn’t collapse.
These carefully chosen ingredients work in harmony, delivering a dessert that is the perfect balance of sweet, tart, creamy, and fluffy. It’s a testament to how simple, high-quality components can create something absolutely extraordinary.

This dessert is all about making your life sweeter and simpler. Imagine the joy of creating something so delicious, even if you’re not a seasoned baker. The step-by-step instructions are designed with you in mind, breaking everything down into manageable bits.
You’ll love how the fresh, zesty lemon and sweet strawberry flavors come together effortlessly. It’s more than a dessert; it’s a moment of pride, a gift for your loved ones, and a chance to indulge in something special without the stress. Trust me, this recipe will make you feel accomplished and leave everyone raving about your baking skills!
While you’re here, check out this strawberry rice krispie treat recipe. It’s incredible!!

Why do you need to use a springform pan when making homemade cheesecake?
Using a springform pan is essential when making cheesecake at home because it allows for a clean, easy release of the dessert without damaging its delicate texture or shape. Unlike traditional pans, the sides of a springform pan can be removed, ensuring the smooth edges of your cheesecake remain intact and picture-perfect.
This feature is particularly helpful for layered or delicate desserts, providing a professional-looking result with minimal effort. Plus, the secure bottom prevents leaks, so your batter stays in place while baking. A springform pan makes it easy to serve a stunning cheesecake that looks just as good as it tastes!

Best Tips for Making Cheesecake at Home:
Cheesecake is often seen as a dessert that you get at a restaurant or pickup at the bakery. But it definitely is something you can make not matter your kitchen skills. My husband still raves about the cheesecakes his mother made when they were kids. You will be glad you try it. Here are my best tips.
Making cheesecake at home can feel like a daunting task, but with the right tips, you’ll be crafting bakery-level desserts in no time. Follow these practical suggestions to ensure a creamy, flavorful, and visually stunning cheesecake every time!
Cuisinart 9-Inch Chef’s Classic Nonstick Bakeware Springform Pan, Champagne Pyrex Essentials (3-Pack) Glass Measuring Cups Set, (1, 2 & 4 Cup) Measuring Cups For Prepping, Baking and Cooking, Preheated Oven, Dishwasher, Freezer, and Microwave SafeKitchenAid Ribbed Soft Silicone Oven Mitt Set, 7HOTEC Heat Resistant 600℉ Food Grade Silicone Rubber Spatula Set for Baking, Cooking, and Mixing Non Stick Dishwasher Safe BPA-Free Multicolor Set of 5Cuisinart HM-50 Power Advantage 5-Speed Hand Mixer, WhiteKitchenAid Artisan Series 5 Quart Tilt Head Stand Mixer with Pouring Shield KSM150PS, Removable bowl, Aqua Sky


Homemade Cheesecake Preparation Tips
- Use Room-Temperature Ingredients
Allow cream cheese, eggs, sour cream, and other dairy products to come to room temperature before mixing. This prevents lumps and ensures a silky-smooth batter. - Don’t Overmix the Batter
Mix your ingredients just until they’re combined. Overmixing can incorporate too much air, leading to cracks on the surface while it bakes. - Prepare Your Pan Properly
Grease your springform pan and add a parchment paper circle to the bottom to make it even easier to release the cake. Wrap the bottom with foil if using a water bath.
Cheesecake Baking Tips
- Use a Water Bath for Even Baking
A water bath (placing your cheesecake pan inside a larger pan with hot water) ensures a gentle, even baking process. This prevents cracks and keeps the cheesecake moist. - Bake Low and Slow
Cheesecakes thrive at lower temperatures. Bake around 300-325°F to allow the filling to set softly without overcooking. - Don’t Open the Oven Too Often
Resist the urge to peek! Large temperature fluctuations can cause the cheesecake to sink or crack, so keep the oven door shut until close to the recommended baking time. - Check for the Perfect Doneness
The edges should look set, but the center should still have a slight jiggle when you gently shake the pan. The jiggle disappears as it cools.
Tips for the Perfect Texture and Flavor
- Cool Gradually
When the baking time is up, turn off the oven and crack the door open, letting the cheesecake cool inside for about an hour. This prevents sudden shrinking or cracking. - Chill Overnight
Cheesecake gets even better after a long rest in the refrigerator. Aim to chill it for at least 6-8 hours (or overnight) to develop the best flavor and texture. - Keep the Toppings Fresh
Add toppings like fruit, whipped cream, or ganache just before serving for the freshest look and flavor.
By following these tips, you’ll avoid common pitfalls and feel confident about the process. Whether you’re tackling a simple classic or a layered creation like Lemon Strawberry Meringue Cheesecake, the results will be divine every time!

Best Tips for Making Homemade Meringue
Making meringue from scratch might feel intimidating, especially when you’re adding it to your cheesecake masterpiece, but trust me, it’s easier than you think! With the right tips and a bit of patience, you’ll unlock a light, fluffy topping that looks and tastes amazing. Here’s how to build your meringue-making confidence and crush it in the kitchen.
Start with the Right Tools
- Use a Clean, Dry Bowl
Any grease or moisture will stop your egg whites from whipping properly. A glass or metal bowl works best for achieving stiff, glossy peaks. - Go for an Electric Mixer
Mixing by hand is heroic, but an electric hand or stand mixer makes the process much easier. It gives you better control and saves you time.
Egg Whites Done Right
- Separate with Care
Make sure no yolk gets into your egg whites. Even a tiny bit of yolk can prevent the meringue from stiffening. Separate eggs while they’re cold, but allow the whites to come to room temperature before whipping. - Add Cream of Tartar
This ingredient stabilizes your meringue, helping it hold its shape beautifully. No cream of tartar? A splash of lemon juice or vinegar can work just as well!
The Whipping Process
- Start Slow
Begin whipping your egg whites on low speed until they become foamy. Then gradually increase the speed to medium or high. Rushing leads to uneven or collapsed peaks. - Add Sugar Gradually
Once the egg whites are white and soft, start adding sugar one tablespoon at a time. This slow addition ensures it dissolves fully, giving your meringue that glossy finish. - Look for Stiff Peaks
You’ll know your meringue is ready when you lift the beaters out, and the peaks stand tall without drooping. Overwhipping can make it grainy, so stop as soon as you get there.
Be Gentle with Your Creation
- Pile it On with Care
When spreading your beautiful meringue over your cheesecake, use a light hand to avoid deflating it. A spoon or spatula works perfectly for creating those swoops and peaks. - Watch as It Toasts
If you’re baking or toasting the meringue, keep an eye on it. It browns quickly, and it’s all about getting that golden perfection without overcooking.
Encourage Yourself to Try
Meringue isn’t about perfection; it’s about learning and having fun with the process. Even if your first attempt doesn’t look like the bakery version, the taste will still be incredible. You’ll gain confidence with each try, and soon enough, you’ll wonder why meringue ever intimidated you. Go ahead, take it one step at a time, and enjoy the sweet, fluffy rewards of your effort! You’ve got this!
The Perfect Pairing: Strawberry and Lemon in Desserts
Strawberry and lemon are a match made in dessert heaven. The sweetness of ripe, juicy strawberries paired with the bright, zesty tang of lemon creates a flavor duo that’s both refreshing and indulgent. Together, they balance each other beautifully, enhancing each flavor while keeping desserts lively and vibrant. Whether you’re in the mood for something light or decadent, strawberry and lemon work together to satisfy both cravings.
Strawberry and lemon bring out the best in each other, making them a dynamic duo for your baking and sipping adventures. Whether you’re whipping up a laid-back treat or a show-stopping dessert, these recipes are sure to inspire and delight. Give this combo a try, and discover why this pairing deserves a permanent spot in your recipe rotation!

Lemon Strawberry Meringue Cheesecake Recipe
Ingredients
Strawberry Crust Ingredients
- 1 box Strawberry Cake Mix
- 1/2 C unsalted sweet cream butter, softened
- 1 TBSP lemon juice
Lemon Cheesecake Ingredients:
- 2 packages of cream cheese, softened
- 3/4 C sugar
- 1/2 C sour cream
- 2 tsp pure vanilla extract
- 1/3 C lemon juice
- zest of 2 large lemons
- 2 large eggs
Marshmallow Meringue Ingredients:
- 4 large egg whites
- 1 C sugar
- 1/4 tsp cream of tartar
Instructions
Crust Instructions:
- Preheat your oven to 325°F.
- Prepare a springform pan by giving it a light coating of baking spray.
- Combine the cake mix, softened butter, and lemon juice in a mixing bowl. Use an electric mixer to blend them well.
- Press the mixture evenly into the bottom of the prepared pan.
- Set the crust aside for now.
Cheesecake Instructions:
- Using an electric mixer, beat the cream cheese and sugar together until the mixture is smooth and fluffy.
- Add the sour cream, vanilla extract, lemon juice, and half of the lemon zest to the mixture. Blend everything until fully incorporated.
- Gently mix in the eggs one at a time, being careful not to over-mix the batter.
- Pour the cheesecake batter over the prepared strawberry crust in the springform pan.
- Bake for 45-50 minutes at 325°F, until the center is set but still has a slight jiggle.
- Remove the cheesecake from the oven and allow it to cool completely at room temperature.
- Once cooled, cover the cheesecake and refrigerate for at least 4 hours.
Marshmallow Meringue Instructions:
- Set up a double boiler or a saucepan with a heatproof glass bowl fitted on top.
- Add about 2 inches of water to the base of the double boiler or saucepan, and bring it to a gentle simmer over medium-low heat.
- Place the egg whites, sugar, and cream of tartar in the top section of the double boiler or the glass bowl.
- Continuously whisk the mixture for 3-5 minutes, until the sugar has dissolved and the mixture is smooth and warm to the touch.
- Remove the bowl from the heat and transfer the mixture to a stand mixer.
- Beat on medium-high speed for 5-7 minutes, or until the meringue forms stiff, glossy peaks.
- Spread the meringue evenly over the chilled cheesecake, creating decorative peaks with a knife or spatula.
- Use a kitchen torch to lightly toast the meringue peaks until golden brown.
- Store the prepared cheesecake in the refrigerator until ready to serve.
Notes
You will also need 1- 9in springform pan.
Nutrition Information:
Yield: 10 Serving Size: 1Amount Per Serving: Calories: 383Total Fat: 20gSaturated Fat: 12gTrans Fat: 1gUnsaturated Fat: 7gCholesterol: 95mgSodium: 201mgCarbohydrates: 47gFiber: 1gSugar: 43gProtein: 5g