Instant Pot Banana Chocolate Chip Bread Pudding
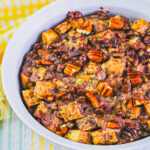
Are you craving something sweet but easy to make? An Instant Pot Banana Chocolate Chip Bread Pudding could be perfect. It’s simple, quick, and made with everyday ingredients. Plus, you’ll spend more time enjoying and less time baking. With your Instant Pot, dessert can be stress-free and delicious.
If you love homemade dessert recipes without the hassle, you’re in the right place! With simple ingredients and your pressure cooker, creating warm, comforting treats is effortless. Plus, using ripe bananas and leftover bread means less waste and more deliciousness. This recipe is cozy, chocolatey, and perfect for busy moms like us.

When it comes to making a family-friendly dessert, this quick homemade bread pudding is a game-changer. Whether you’re a kitchen pro or new to cooking, it’s completely doable. The step-by-step process is simple, so you won’t feel overwhelmed. Plus, it’s a great way to bring everyone together and create moments that will be remembered.
Ripe Banana Dessert Ideas
If you’re looking for more ways to use those ripe bananas, I’ve got you covered with some irresistible ideas. Layers of sweetness, creamy pudding and salty sweet combos!
- Homemade Banana Pudding
- No Bake Banana Blueberry Pie
- Layered Banana Pudding Cake
- Bacon Peanut Butter Banana Pie
With so many fun and easy options, there’s a recipe here to inspire your next dessert creation!

Ingredients Needed To Make This Banana Chocolate Chip Banana Bread in the Electric Pressure Cooker
To create a rich and comforting Banana Chocolate Chip Bread Pudding in your electric pressure cooker, you’ll need a handful of pantry staples and a few fresh ingredients that balance sweetness, creaminess, and texture. Here’s everything required to whip up this irresistible dessert.
Ingredients and Their Significance
- stale bread: The base of the pudding! Stale bread absorbs the liquid marvelously, creating a soft yet firm texture for the dessert.
- eggs: They help bind all the ingredients and provide structure for that custard-like consistency.
- sugar: Adds just the right amount of sweetness to highlight the bananas and chocolate.
- vanilla extract: Enhances the flavor profile with a warm, aromatic note.
- ground cinnamon: Brings a cozy, spiced essence that pairs beautifully with banana and chocolate.
- salt: Balances the sweetness and elevates all the other flavors.
- milk: Creates the rich custard base and adds creaminess to the pudding.
- butter: Adds a touch of decadence while keeping the bread pudding moist and rich.
- ripe bananas: The star of the show! These sweeten naturally and add a luscious banana flavor.
- semi-sweet chocolate morsels: Pockets of melted chocolate add a rich indulgence to every bite.
- chopped pecans: Adds a delightful crunch and nutty flavor, elevating the dessert’s texture.
When these ingredients come together, they create an unforgettable dessert that balances flavors and textures perfectly. The combination of the soft, custard-soaked bread, bursts of chocolate, and natural sweetness of ripe bananas makes every bite indulgently comforting. Plus, the optional pecans add a delightful crunch for anyone who loves a bit of texture. It’s a dessert designed to impress with minimal effort!

This bread pudding isn’t just delicious; it’s a smart way to use ingredients you probably already have in your kitchen. Stale bread sitting on the counter? Those overripe bananas in the fruit bowl? They transform into magic with this recipe! It’s versatile, budget-friendly, and, with the help of your Instant Pot, ready in no time. Why not give it a try and turn your pantry staples into something unforgettable?
While you’re here, check out our other pressure cooker dessert recipes.

Tips for Cooking with a Casserole Dish in Your Electric Instant Pot
- Choose the Right Casserole Dish
Look for a dish that’s labeled as Instant Pot-compatible or oven-safe. Glass, ceramic, or stainless steel dishes work great, as long as they can handle high pressure and heat. Make sure the dish can fit easily into your Instant Pot without touching the sides. - Ensure Proper Fit
Before you begin cooking, test that the dish fits comfortably into the inner pot. There should be enough room to allow steam to circulate around it. A snug but not tight fit is ideal for even cooking. - Use a Trivet
Always place the casserole dish on a trivet inside the Instant Pot. This keeps it off the bottom of the pot and prevents the dish from being in direct contact with the heat source, which could cause uneven cooking or even cracking. - Add Water for Steam
Pressure cookers rely on steam to build pressure, so don’t forget to add water to the inner pot. Typically, 1 to 1.5 cups is enough. The water level shouldn’t reach the top of the trivet. - Cover Your Casserole Dish
For certain recipes, covering the dish with aluminum foil or a silicone lid can help prevent excess moisture from dripping into your food. This is especially helpful for recipes like bread pudding or cheesecakes. - Adjust Cooking Times
Cooking in a casserole dish might require slight adjustments. Add a few extra minutes to the usual cooking time for your recipe, as the Instant Pot will need to heat the dish and its contents evenly. - Release Pressure Carefully
When your recipe has finished cooking, opt for a natural pressure release whenever possible to avoid sudden temperature changes that could damage your casserole dish. - Watch for Burn Errors
With thicker recipes like casseroles or desserts, ensure there’s enough liquid in the bottom of the Instant Pot. This prevents burn warnings and keeps your dish cooking evenly.
By using these simple tips, you’ll find that cooking with a casserole dish in your Instant Pot is a breeze.

Tips for Covering Your Casserole Dish with Foil Before Adding It to the Instant Pot
- Why Covering is Important
Covering your casserole dish with foil helps prevent excess moisture from dripping into your dish while cooking, especially for recipes like casseroles, bread puddings, or cheesecakes. This keeps the texture consistent and the flavors intact. - Use Heavy-Duty Foil
Opt for heavy-duty aluminum foil to ensure durability under high pressure and to avoid tearing while handling the dish. This provides a sturdy barrier against the steam and protects your food. - Secure the Foil Properly
Stretch the foil tightly over the top of the casserole dish, pressing it firmly around the edges. If your dish has a wide rim, fold the foil down over the sides to secure it in place and to prevent it from slipping during cooking. - Ensure a Tight Seal
For best results, double layer the foil if needed to create a tight seal, especially for liquid-heavy dishes. This prevents any steam or water from seeping into your food and avoids sogginess. - Avoid Contact with Instant Pot’s Sides
Make sure the foil-wrapped dish doesn’t touch the inner walls of the Instant Pot. Steam circulates better when there’s space, and it keeps the foil from sticking or tearing against the pot’s sides. - Add Vent Holes if Needed
For certain recipes, a few small holes poked into the foil can help release steam from the dish. Use this method only if the recipe calls for it, as it may not be required for all dishes. - Check for Loose Edges
Before placing the casserole dish into the Instant Pot, ensure no loose edges of foil are sticking out or hanging over the Instant Pot’s rim. This protects the sealing ring from any foil obstruction during pressure cooking. - Be Gentle After Cooking
Once your recipe is done and you’ve naturally released the pressure, carefully remove the foil to avoid any steam burns. The foil may be hot and slightly damp, so use caution when handling it.
Properly covering your casserole dish with foil can make a big difference in your Instant Pot recipes. It secures the flavors, maintains the right texture, and ensures your dish comes out perfect every time!
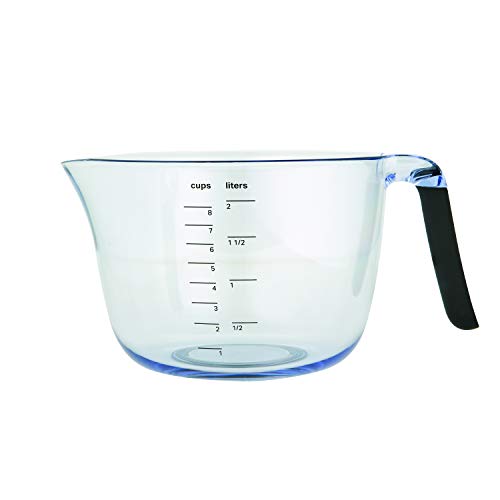
COMFEE’ 16 in 1 Electric Pressure Cooker Instant Multi Cooker Olla de Presion Non-Stick Pot Yogurt Maker Rice Cooker Slow Cooker Sauté Steamer 8 Quarts for Family Feast Corningware FS5 1.5qt/1.4L Round French White Casserole DishSilicone Spatulas, 11 inch Rubber Spatula Heat Resistant Seamless One Piece Design Non-Stick Flexible Scrapers Baking Mixing Tool (4 Piece)KitchenAid Universal Plastic Batter Bowl, 8-Cup, Onyx BlackAnchor Hocking Batter Bowl, 2 Quart Glass Mixing Bowl


Tips for Storing Leftovers of Instant Pot Banana Chocolate Chip Bread Pudding
Cool the Dish Properly
Allow the pudding to cool to room temperature before storing it. Putting a hot dish directly into the fridge can cause condensation, which may impact the texture of your leftovers.
Use Airtight Containers
Transfer the leftovers into an airtight container or cover the dish tightly with plastic wrap or aluminum foil. This helps prevent it from drying out and keeps the flavors intact.
Refrigerate for Short-Term Storage
For short-term storage, place the dessert in the refrigerator if you plan to finish it within 3 to 4 days. Store it on a shelf where the temperature is more consistent rather than the door.
Freeze for Long-Term Storage
For longer storage, use a freezer-safe container or wrap individual portions tightly in plastic wrap followed by foil. This will prevent freezer burn and make reheating easier. Properly stored, it can last up to 2 months in the freezer.
Label and Date Your Storage
Always label containers with the date so you can track how fresh it is. This ensures you enjoy your leftovers at their best quality.
Reheat with Care
To warm it up, use the microwave for quick reheating or the oven for more even heating while keeping the texture intact. If frozen, allow it to thaw in the fridge overnight before reheating. Add a splash of milk or cream before warming to restore moisture.
Avoid Overheating
Warm only until heated through to maintain the dessert’s soft and moist texture. Overheating can make it rubbery or dry.
By following these steps, you’ll enjoy every bit of your Banana Chocolate Chip Pudding—even as leftovers!

How Far in Advance Can You Make Banana Chocolate Chip Bread Pudding?
This dessert is perfect for prepping ahead, saving you time without compromising on flavor. Here’s how you can plan and store it early:
Prepare Up to a Day Ahead
You can assemble the dish up to 24 hours before cooking. Simply combine all the ingredients, pour the custard over your chosen base, and allow it to soak in a casserole dish. Cover the dish tightly with plastic wrap or foil, then refrigerate until ready to bake.
Store Before Cooking
For this recipe, letting the base soak in the custard mixture for several hours or overnight enhances both flavor and texture. Make sure to seal the dish well to prevent drying out or absorbing any unwanted odors from the fridge.
Reheat When Serving
When you’re ready to serve, reheat the pudding gently in the oven at 325°F until warmed through. If it seems a little dry, add a splash of milk or cream before reheating. You can also microwave individual portions for a quicker option, adding a bit of milk for extra moisture if needed.
By preparing this dish in advance, you’ll free up time to enjoy the meal with family and friends. Whether you assemble it the night before or months ahead, this pudding is guaranteed to deliver indulgent and comforting flavors when served!

Easy Desserts for Busy Moms
Making desserts in your pressure cooker isn’t just easy; it’s a total game-changer for busy moms! All the cozy flavors of fall without the fuss. You can do something fancy that tastes like it came from the bakery or something as easy and wholesome and apple sauce.
- Instant Pot Apple Pie
- Instant Pot Chocolate Cake
- Instant Pot Creme Brulee Cheesecake
- Instant Pot Apple Sauce
These recipes are simple, stress-free, and bound to become family favorites. Give one a try today—you deserve it!

Best Bread for Making Bread Pudding
Choosing the right base makes all the difference for pudding desserts. The ideal option absorbs the custard mixture without falling apart, offering a perfect balance of creamy and soft with a slight chew. Here are some top choices and why they’re great:
Brioche
For richness, brioche is unbeatable. This buttery, slightly sweet option enhances the flavor of the dish and creates a custard-like texture when soaked. Its soft crumb absorbs liquid beautifully without becoming mushy, making it a go-to for indulgent puddings.
Challah
Similar to brioche but less buttery, challah is another excellent choice. Its slightly dense texture soaks up custard while keeping its shape. The subtly sweet flavor pairs wonderfully with spices like cinnamon and nutmeg.
French Loaf
A rustic French loaf works well because of its sturdy crust and chewy interior. Day-old slices are especially effective at absorbing custard while maintaining a satisfying texture, ideal for a classic or less sweet version.
Leftover Sandwich Slices
Don’t overlook everyday sandwich slices! White varieties work surprisingly well for pudding, especially if slightly stale. Though softer, they absorb liquids easily, creating a smooth texture. Whole wheat can be used for a heartier feel.
Croissants
For a decadent twist, croissants are a stellar pick. Their flaky, buttery layers add richness and depth. Even if slightly stale, they absorb custard exceptionally, offering both flavor and texture.
Cinnamon Raisin Loaf
This option doubles as a flavor boost. The raisins bring a pop of sweetness, while the cinnamon provides warmth, eliminating the need for extra spices. It’s a shortcut to a flavorful, aromatic dessert.
Artisan or Sourdough Options
These choices add a tangy element to balance sweetness. The firm crust and dense interior create a hearty and textured dish that’s uniquely satisfying and delicious.
No matter your pick, slightly stale pieces work best. The dryness helps absorb more custard without falling apart. If you only have fresh slices, cut them into cubes and toast lightly in the oven for a similar effect.
Ultimately, the best choice depends on the flavor and texture you want. Mix and match to discover endless ways to elevate your pudding!

Instant Pot Chocolate Chip Banana Bread Pudding
Ingredients
- 7 to 8 cups stale bread, cubed
- 2 eggs
- ¼ cup sugar
- 1 teaspoon vanilla extract
- ½ teaspoon ground cinnamon
- ⅛ teaspoon salt
- 1 ¼ cups milk
- 2 tablespoons butter, melted
- 2 ripe bananas, mashed
- ½ cup semi-sweet chocolate morsels
- ½ cup chopped pecans, optional
Instructions
- Lightly coat a 2 ½-quart casserole dish (sized to fit inside your electric pressure cooker) with nonstick cooking spray.
- Add the bread cubes to the prepared dish. Sprinkle chocolate chips and pecans (if using) over the top, letting them settle between the bread pieces.
- In a separate mixing bowl, combine the remaining ingredients. Whisk until the mixture is smooth, then pour it evenly over the bread cubes, ensuring every piece is soaked. If needed, gently press the bread down to fully absorb the liquid.
- Cover the casserole dish with a piece of aluminum foil. Spray the underside of the foil with nonstick cooking spray to prevent sticking.
- Place the trivet into the electric pressure cooker and pour in the amount of water recommended by the manufacturer. Fold a sheet of aluminum foil into a sturdy strip to create a sling, and carefully use it to lower the casserole dish onto the trivet.
- Secure the pressure cooker lid and move the valve to the sealing position. Set the cooker to “manual” or “pressure cook” mode and select 30 minutes for the cooking time.
- Once the cooking cycle is complete, allow the pressure to release naturally for 15 minutes. Afterward, do a quick release to remove the remaining pressure.
- Using the foil sling, carefully lift the casserole dish out of the pressure cooker. Be cautious as it will be very hot.
- Serve warm, topped with whipped cream, chocolate or caramel sauce, and/or a scoop of vanilla ice cream for an indulgent finish.
Notes
This recipe is prepared in an 8 quart Instant Pot.
Nutrition Information:
Yield: 10 Serving Size: 1Amount Per Serving: Calories: 767Total Fat: 18gSaturated Fat: 6gTrans Fat: 0gUnsaturated Fat: 11gCholesterol: 46mgSodium: 1171mgCarbohydrates: 129gFiber: 8gSugar: 27gProtein: 23g